I have been spending the last few weeks working on and off with Amazon Dash buttons for a few upcoming presentations around IoT and Salesforce. I wanted to give some initial impressions and a quick rundown of the best way I found to connect by Dash to Salesforce.
First, the dash buttons that you buy from Amazon for detergent or toilet paper cannot be directly hacked to repurpose the button. You need something in the middle of the button and the internet to intercept the signal from the dash and repurpose the communication to do something else. I have a working demo with a Raspberry Pi and a Charmin dash using Python and Salesforce’s REST API to do some stuff. This was pretty challenging as you need to do some networking and catch an ARP request from the button and then do your logic. That seemed like WAY overkill for what I was trying to do, as well as not really apply at all to any real world application.
Here are a few cool walk-throughs that helped me set up the dash and intercept the communication to then do something else with:
Hacking Amazon’s $5 Dash Button to order Domino’s Pizza
Drizly Dash: Beer Me with the Press of a Button
So I went back to the drawing board and found this article:
AWS Greengrass – Run AWS Lambda Functions on Connected Devices
I was thinking wouldn’t it be great if you didn’t need the Pi and could just use Lambda functions with the Dash to connect to Salesforce? Turns out, it WOULD be great, and it pretty simple to do.
Amazon Button Setup
First: Set up an AWS account here: https://aws.amazon.com/iotbutton/
Second: you need an IoT Amazon Dash button. Amazon was sold out of the Gen 2 so I bought a Gen 1.
Gen 2: https://www.amazon.com/dp/B01KW6YCIM
For the purposes of this explanation, I’m going to change my Serial Number to the following value for all examples so you don’t accidentally use my serial and get me into trouble.
Serial = ‘TestSerialNumber’
Third: What worked best for me is to download the IoT iPhone app as soon as I got it and go through the setup process. The app is called AWS BTN Dev and you can add a new device and select the type of service or functions to run on it. Follow the directions, (connect to it’s wifi and configure your own wifi for it to communicate with) until you get to the Lambda step. Here, you will want to select the language and service type you are comfortable with. What I found to be the best about this is it has an IFTTT integration or option completely build in. That was probably the best thing that happened to me all day when I found that. If you could connect to IFTTT then you can do just about anything you want with configurable automation. Maybe we don’t need any code for this project!


Ok, so you have selected your Lambda function as ‘Trigger IFTTT Maker (python)’. Follow the prompts and make sure to save the function in relation to the device. Then, sign into your AWS Account and find Lambda Functions. You should have 1 option available from what you set up on your phone, unless you have used Lambda before.
Fourth: Click into the Lambda Function you kind of set up on your phone in the web ui. This should take you to the function itself which is extremely basic. Ok, I kind of lied. There is a BIT of code.
'''
This is a sample that connects Lambda with IFTTT Maker channel. The event is
sent in this format: <serialNumber>-<clickType>.

The following JSON template shows what is sent as the payload:
{
"serialNumber": "GXXXXXXXXXXXXXXXXX",
"batteryVoltage": "xxmV",
"clickType": "SINGLE" | "DOUBLE" | "LONG"
}

A "LONG" clickType is sent if the first press lasts longer than 1.5 seconds.
"SINGLE" and "DOUBLE" clickType payloads are sent for short clicks.

For more documentation, follow the link below.
http://docs.aws.amazon.com/iot/latest/developerguide/iot-lambda-rule.html
'''

from __future__ import print_function

import boto3
import json
import logging
import urllib2

logger = logging.getLogger()
logger.setLevel(logging.INFO)

maker_key = '1234567891234567489-7' # change it to your Maker key

def handler(event, context):
logger.info('Received event: ' + json.dumps(event))
# make sure you created a receipe for event <serialNumber>-<clickType>
maker_event = '%s-%s' % (event['serialNumber'], event['clickType'])
logger.info('Maker event: ' + maker_event)
url = 'https://maker.ifttt.com/trigger/%s/with/key/%s' % (maker_event, maker_key)
f = urllib2.urlopen(url)
response = f.read()
f.close()
logger.info('Event has been sent to IFTTT Maker channel')
return response
Fifth: Go to IFTTT and create an Account or use your existing if you have one. Then go to https://ifttt.com/maker_webhooks and click the Documentation button to get your Maker key. This will be displayed at the top of the page. Use this to go back to your Lambda Function and plug it into the code for the variable called ‘maker_key’:
maker_key = ‘1234567891234567489-7’
Remove all brackets and you should be good to go. Thats ALL the code you need to write/change. Kind of underwhelming, right?
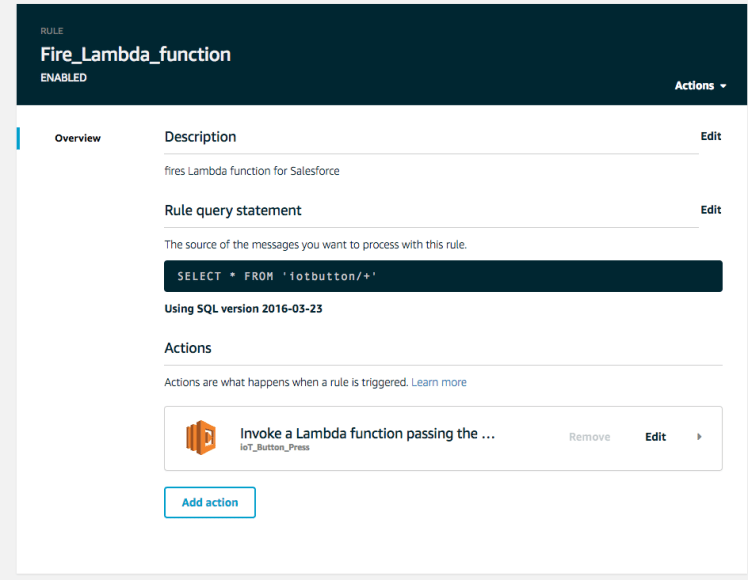
Sixth: Now, we need to set a trigger in Lambda Functions. In the Lambda console, click Triggers and Add a Trigger if there isn’t already one. If I remember correctly, I needed to delete the existing trigger and create my own. Select AWS IoT, make sure it pulls in the device type from your function and give it the serial number of your device, making sure the trigger is enabled. Edit the details of the Trigger to be similar to below:
At this point (or a few steps before), you can test the function to get the output. Use the following test to get a response:
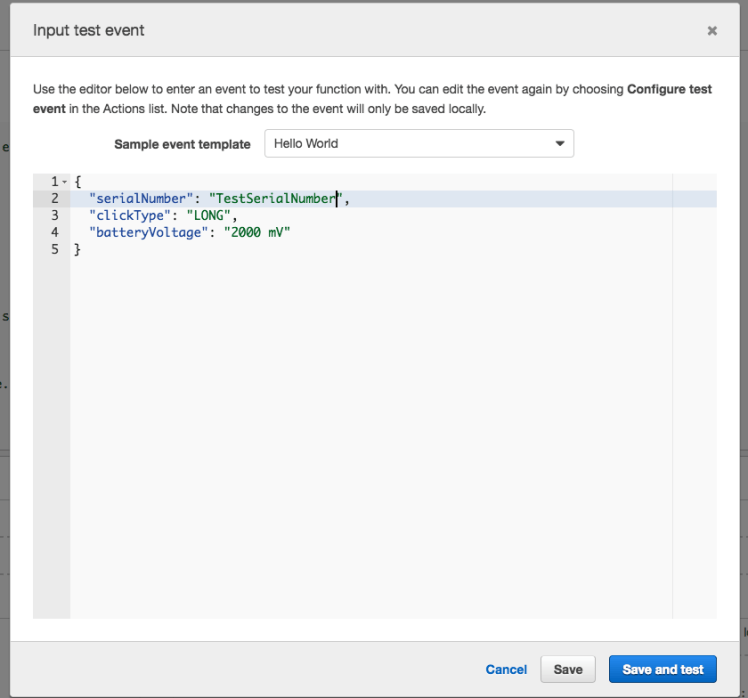
{
"serialNumber": "TestSerialNumber",
"clickType": "SINGLE",
"batteryVoltage": "2000 mV"
}
If everything lines up correctly, you should get the output of:
“Congratulations! You’ve fired the TestSerialNumber-SINGLE event”
Finally, you have set up AWS and your button. Now, you just need to set up the automation to Salesforce using IFTTT.
IFTTT setup
Within IFTTT, click My Applets and then click New Applet. This next part is extremely important for the automation to work.
Make your This component be a Webhook, and your Event Name MUST be your Dash serial number and a hyphen and the click type. For example:
G123456789654-SINGLE
If you look back at your function, what the function tries to do is URL hack IFTTT by inserting the serial number received from the device with the click type events which are spelled out in the comments at the top of the code (bold and underlined for emphasis):
maker_event = ‘%s-%s‘ % (event[‘serialNumber’], event[‘clickType’])
logger.info(‘Maker event: ‘ + maker_event)
url = ‘https://maker.ifttt.com/trigger/%s/with/key/%s’ % (maker_event, maker_key)
In my case, I want to connect to Salesforce, so my That component will be Salesforce. I’m going to do a simple example of just posting to Chatter. If I have already connected my Salesforce org, IFTTT will be able to read the metadata from the org and pull in things like Objects and Chatter groups automatically. If you haven’t done that you will need to do that to proceed any further.
I then configure the Group to post to and the message that will be posted to the group when the button is pressed in this case a single time. You can leave the notification section on or off but make sure to activate the Applet. Once that is done, let’s test it!
If it worked, great! If not, you will need to troubleshoot. Some gotchas that I encountered were two triggers being set up so I was always creating two Chatter posts. Also, the Event Name not being properly set up caused me some heartache for a while. Here’s a short video with a demo of what has been set up:
https://www.dropbox.com/s/mpil2p2y5jui2nw/IMG_1880.MOV?dl=0
Let me know if you have any questions. Let’s see where this thing goes!
