Salesforce is pretty amazing. It allows us to use the cloud to store all of our stuff; Accounts, Contacts, Files, etc. However, many Salesforce teams work with other teams that wish Salesforce data was easily accessible just like the rest of the data that your company owns.
At my company, we use Microsoft and Salesforce (for the most part). While our Microsoft developers can access Salesforce through one of their various APIs, they mention how nice it would be to just query a SQL table without having to do an expensive hop to Salesforce first as there are some considerations when doing so, like lag and limits inside of Salesforce.
Another consideration: Reporting in Salesforce kind of stinks. It is great for finding a list of my Accounts, but to do trending or complex reporting, it just doesn’t hit the bar.
We could get Wave, but nah.
Brett talked to me a few months ago, that his previous company used an application called ForceAmp which relies on DBAmp as a foundation. We have a need to replicate some or all of our Salesforce data to a local SQL database to be consumed by other users. I wanted to show how easy it is to set up. Before reading, I am by no means an expert on how to use ForceAmp but have been very impressed on how easy it is to set up and start working.
Pre-Reqs: (ugh, I know. Applications to worry about…)
- Windows 2008 R2 or higher (64-bit)
- SQL 2005 or higher with SQL Server Manager (I guess you can use SQL Server Express, but don’t do that)
- .NET 4.5 or higher
- There are a few more about SQL 2008 and datetime, so review your install guide for specifics
First, you can either purchase ForceAmp or request a 30 day trial. When you do this, you will get an install package and a serial number. It comes with a handy-dandy Install Guide which I HIGHLY recommend reading almost all of it prior to finalizing your implementation. It has a ton of stuff that may make your replication automation easier (I’ll talk about a few options later).
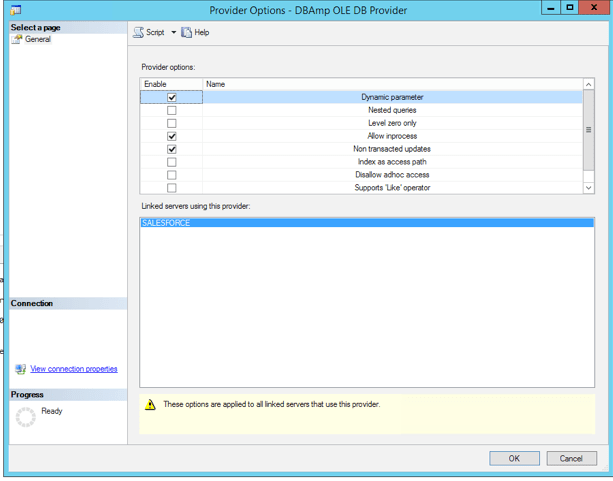
After installation, configure your DBAmp.DBAmp provider in SQL Server Manager on the device you installed ForceAmp (Server Objects>Linked Servers>Providers and right click DBAmp.DBAmp and go to Properties). Make sure the following options are checked:
Next, go to Server Objects>Linked Servers and right click to create a New Linked Server.
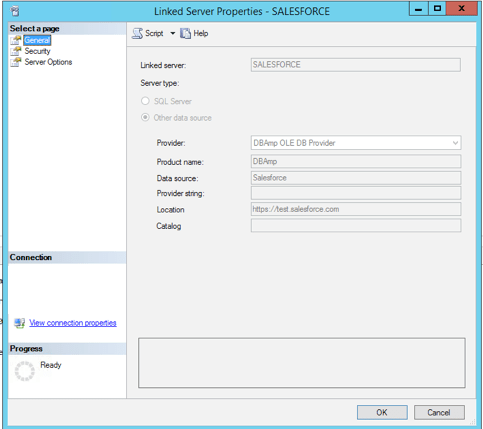
You must provide authentication details for Salesforce here, so use a Salesforce account that will have the access necessary to get the data you plan to use. In my example, I’m using a admin system account. Make sure to use your security token here if your org requires it. Review the install guide for what to enter on the Security page and Server Options page.
Now, we need to create a database to hold all of our data, and install the Stored Procedures so we can start using automation! So, create your empty Salesforce database. I’ll wait.
Go back to the install location of DBAmp and find Create DBAmp SPROCS.sql. Open this in a new query, making sure you have selected your Salesforce database created above as the target. Then….execute!
We’re almost done with setup. You’re only like 5 minutes in, so chill bro.
We now need to find the DBAmp Configuration application which was installed onto your machine at the beginning. We’re going to set a few options here, like log location, authentication method ( for SQL) and Proxy credentials as necessary.
At this point, you can officially start doing stuff with Salesforce. You can query or pull down stuff, or even push items to Salesforce (not discussed here).
Select * from SALESFORCE…Contact
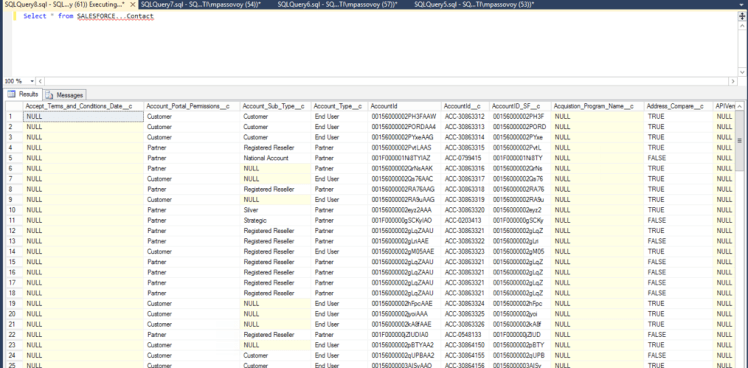
We just did a query from SQL which was pulled directly from Salesforce. This data is not stored locally, however. We can use just about all of the capabilities of SQL to plan with the data in Salesforce now, that we wish were built into SOQL.
Now, let’s start saving some data 🙂
There are a bunch of ways to pull data and save it in SQL. I’m going to describe 2 ways with my happy path that I believe are the easiest to understand and implement.
- SF_Replicate – This stored procedure will pull down an entire table from Salesforce (Account, Contact, Lead, etc) and create a new table in your Salesforce database.
- SF_Refresh – This stored procedure will get the latest updates to a table since the last time it was replicated or refreshed, including schema changes.
There are some considerations you need to take into account before starting, such as:
- API use availability (do you have enough API calls to pull the data)
- Local storage capacity on your replication box
- Other folks working on the same box/server may cause you latency or them latency during large data transfers
First, we need to pull a table. We’re going to start with Accounts. If you have TONS of Accounts, you may want to use the Bulk API to do this. If not, then you don’t need to use the Bulk API switch in the command below. Open a new Query, making sure your Salesforce database is selected as the target and enter the information below and then execute:
Exec SF_Replicate ‘SALESFORCE’, ‘Account’, ‘bulkapi’
- SF_Replicate – Stored procedure from above
- SALESFORCE – Name of our Linked Server
- Account – Name of our object we want to use
- bulkapi – Use of Bulk API for the initial call (not required, will use Web Services API by default)
This will run for a while, depending on your data volume. When it’s done, you will have a new table in your Salesforce database that has all of the Account information (ignore the Contact table, unless you want to do the same thing from above for Contacts, or any other object).

Alternatively, you can use a stored procedure or SF_ReplicateAll which will pull down all tables, used in conjunction with a default table created (pictured above) called TablesToSkip which will then skip the objects mentioned in this table. In some cases, this might be easier to use, but my org is massive, so I want to be very selective on the data I am going to pull down.
Next, we want to ensure that this table stays up to date. We can use SF_Refresh to get the latest updates since the last update to this table. You can do this manually by entering the following information into a new Query making sure your Salesforce database is selected as the target and enter the information below and then execute:
Exec SF_Refresh ‘SALESFORCE’, ‘Account’, ‘Yes’, ‘No’, ‘bulkapi’
- SF_Refresh – Stored procedure from above section
- SALESFORCE – Name of our Linked Server
- Account – Name of our object we want to use
- Yes – SchemaError, set to Yes to automatically detect schema changes and include in refresh (other options available in install guide)
- No – Verify option, I don’t care to verify the data. Other options include ‘warn’ or ‘fail’
- bulkapi – Use of Bulk API for the initial call (not required, will use Web Services API by default)
Similar to SF_ReplicateAll, you can also use SF_RefreshAll which will use the same options to reduce the work necessary.
That’s pretty great! You just downloaded all of the Account object into SQL, and then got the newest updates since the original download! But, hey, that doesn’t really help if I have to do this manually all the time, right?

If you’re a SQL wizard, you know about Jobs. If you’re not a SQL wizard, you’re going to learn about Jobs! Jobs are a way in SQL to automate commands. We’re going to set up a job to automate the above command, so it can run on a schedule, and we can include other objects in our database, and then automate their refresh at the same interval. This way, our SQL database will only ever be some expected amount of time out of date from Salesforce (this can be as low as 1 minute).
First, in SQL Server Manager, go to SQL Server Agent>Jobs and right click Jobs and select New Job. Give it a name, Category and Description to help identify what it’s used for by other users of this box.
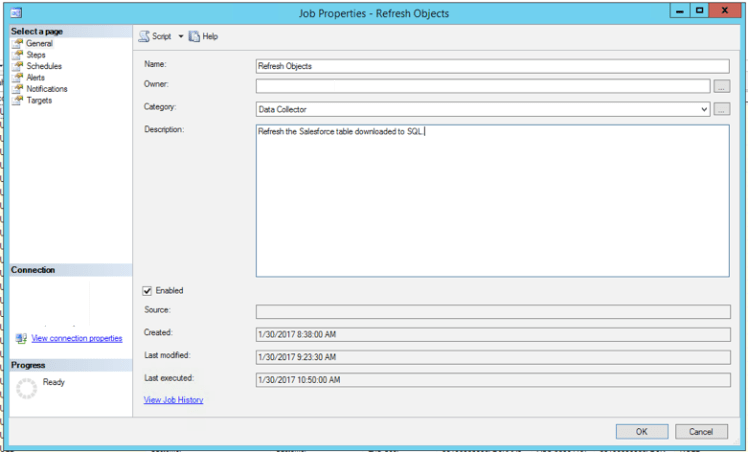
The select Steps and click New. Give the step a name, and make sure to select your Salesforce database as the target (otherwise this will error out).
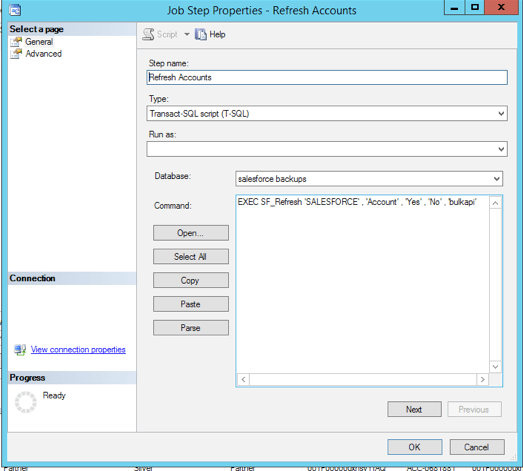
Last, Go to Schedule within the Job. Click New, give your Schedule a name a type (probably Recurring), a frequency and when the Job should run. In my case, I have set this job to run every 5 minutes, meaning at most my tables will be 5 minutes out of data from Production. You can add a step for any additional objects you want to refresh, so the interval just catches the latest updates for all objects you have downloaded.

When we enable this, the scheduled job will then run at whatever interval you have identified. If you ever need to see if something failed, you can use the Job Activity Monitor in the left nav to see how your jobs are doing, and then drill in to get a detailed report if something went wrong.
Finally, you probably will want to have some reporting available for how your data syncs are going. DBAmp has a built in module to store and report on your jobs. See the section on ‘Using DBAmp Performance Package’ which will allow you to report as shown below:
Select * From DBAmp_Log

Hopefully, this has been helpful to you. You have either purchased ForceAmp or are interested in replicating your Salesforce data locally. I have heard of some other applications that can make this extremely easy, and this was the first I have tried, but it has been a great intro. Personally, this application has made it extremely easy to do without being a SQL wizard myself.
